Yoga and Fitness: Practical Balance and Strength Tips
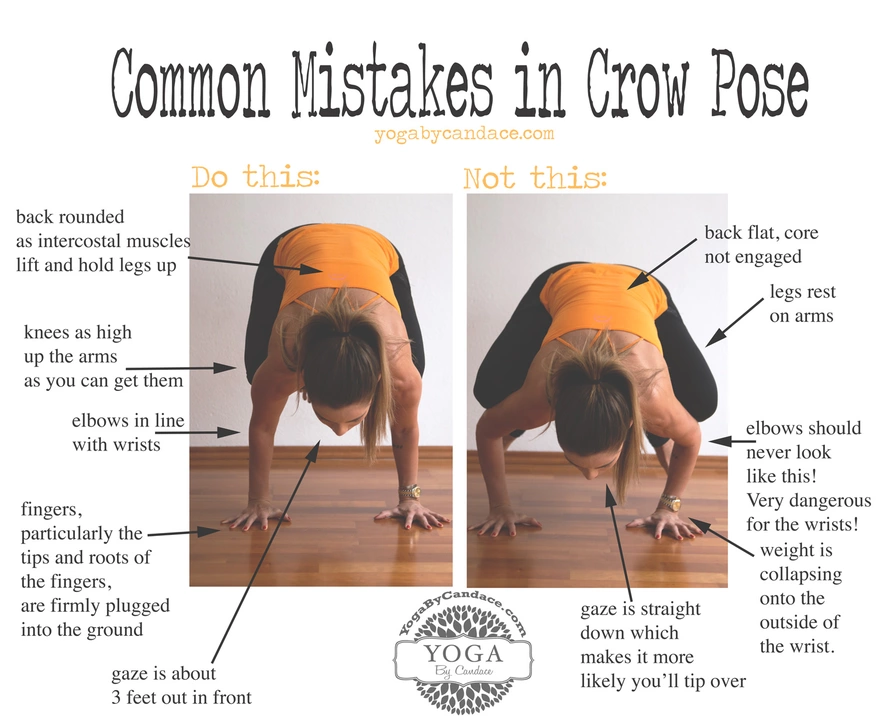
Want to stop your knees from slipping in crow pose? Start with simple, practical steps you can use right now. Warm your wrists and fingers for at least five minutes to protect joints and build the small muscles you need. Use a towel or sticky mat under your palms if your hands slide. Place your hands shoulder width apart, spread the fingers wide, and press evenly through the base of the fingers, not just the heel of the hand. Engage the core like you are pulling your belly toward your spine; this shortens the distance your center of mass needs to travel forward.
Work on hip openers and inner thigh engagement to create a stable shelf for your knees. Supta baddha konasana as a gentle opener and malasana are great starters. Practice squeezing your knees toward each other and hugging the upper arms with the outer edges of the thighs. This gives the knees something to bite into and reduces slip.
Build arm and shoulder strength with plank variations and slow chaturanga. Spend time lifting into a tripod prep with a block under the forehead so you can feel balance without full weight on the hands. Wall-assisted crow is a forgiving way to find balance safely: face a wall, place your hands an inch from it, and lean forward so the wall catches your head if you tip.
Small, specific drills beat random practice. Try shifting your weight forward while keeping one foot on the floor, then the other. Do three sets of five slow lifts where you tap your toes to the floor between attempts. Use short holds—five to ten seconds—to train balance and reduce fear. Record your attempts or train with a friend who can spot you.
Pay attention to breath and timing. Inhale to set up, exhale as you lift; coordinating breath with movement stabilizes the nervous system. If you panic or hold your breath, your body tightens and slipping becomes more likely. Keep practice sessions short and focused rather than long and scattered.
Be patient and consistent. Expect small changes week to week, not overnight miracles. If pain arises in the wrists or knees, stop and seek guidance from a qualified teacher. A few targeted cues, steady practice of core and hip work, and the right grip can change your crow practice fast.
On this Yoga and Fitness page you’ll find tips like these, routines to build strength, and clear progressions for arm balances. Try a focused two-week plan: wrist warm-ups, core work, hip openers, three times a week. Track progress and adjust intensity as comfort improves.
Check our detailed post on how to prevent knees from slipping in crow pose for step-by-step drills, photos, and a short practice you can try today. It covers warm-ups, hand placement, hip mobility moves, and a two-week sequence to build confidence. If you prefer one-on-one help, consider a private session or a workshop focused on arm balances. Start gently, track progress.
How to prevent my knees from slipping in a crow pose?
In my latest blog post, I discuss the common issue of knees slipping in crow pose and share some useful tips to prevent it. I emphasize the importance of building a strong foundation by warming up the wrists and engaging the core. Additionally, I mention the role of proper hand placement and the use of a towel or mat for added grip. Practicing hip openers and engaging the inner thighs can also help in maintaining stability. Finally, I encourage patience and consistent practice to master this pose without slipping.
