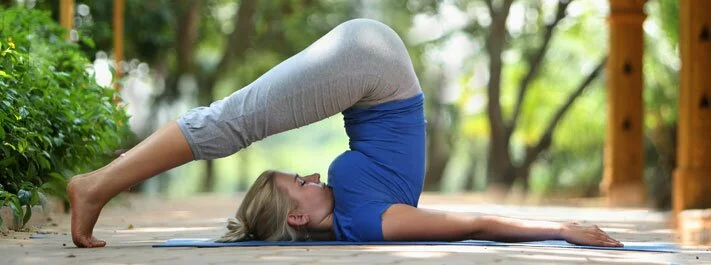
Halasana (hah-lah-sah-nah; Sanskrit: हलासन; IAST: Halāsana) or Plow Pose is an asana.
The name comes from the Sanskrit words hala (हला) meaning “plow” and asana (आसन) meaning “posture” or “seat”.
The practitioner lies on the floor, lifts the legs, and then places them behind the head. Experienced practitioners may enter Halasana from a standing position by tucking chin to chest, placing hands on the floor, walking the feet towards the hands and bending at the elbows to lower shoulders to the floor.
Step by Step:-
- From Salamba Sarvangasana, exhale and bend from the hip joints to slowly lower your toes to the floor above and beyond your head. As much as possible, keep your torso perpendicular to the floor and your legs fully extended.
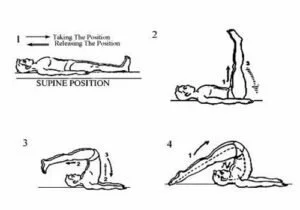
- With your toes on the floor, lift your top thighs and tailbone toward the ceiling and draw your inner groins deep into the pelvis. Imagine that your torso is hanging from the height of your groins. Continue to draw your chin away from your sternum and soften your throat.
- You can continue to press your hands against the back torso, pushing the back up toward the ceiling as you press the backs of the upper arms down, onto your support. Or you can release your hands away from your back and stretch the arms out behind you on the floor, opposite the legs. Clasp the hands and press the arms actively down on the support as you lift the thighs toward the ceiling.
- Halasana is usually performed after Sarvangasana for anywhere from 1 to 5 minutes. To exit the pose bring your hands onto your back again, lift back into Sarvangasana with an exhalation, then roll down onto your back, or simply roll out of the pose on an exhalation.
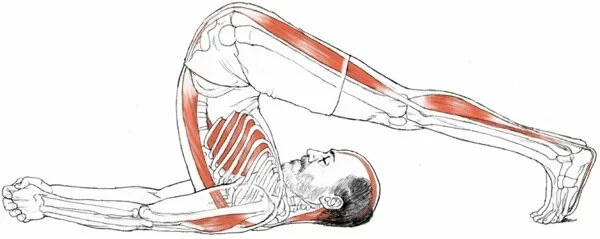
Anatomical Focus:-
Thyroid
Benefits:-
- Calms the brain
- Stimulates the abdominal organs and the thyroid gland
- Stretches the shoulders and spine
- Helps relieve the symptoms of menopause
- Reduces stress and fatigue
- Therapeutic for backache, headache, infertility, insomnia, sinusitis
Contraindications and Cautions:-
- Diarrhea
- Menstruation
- Neck injury
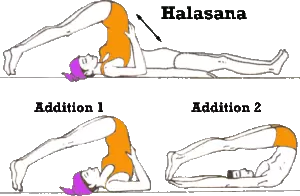
- Asthma & high blood pressure: Practice Halasana with the legs supported on props.
- Pregnancy: If you are experienced with this pose, you can continue to practice it late into pregnancy. However, don’t take up the practice of Halasana after you become pregnant.
- With the feet on the floor, this pose is considered to be intermediate to advanced. It is not advisable to perform the pose in this way without sufficient prior experience or unless you have the supervision of an experienced instructor.
 Beginner’s Tip:-
In this pose (and its companion, Salamba Sarvangasana) there’s a tendency to overstretch the neck by pulling the shoulders too far away from the ears. While the tops of the shoulders should push down into the support, they should be lifted slightly toward the ears to keep the back of the neck and throat soft. Open the sternum by firming the shoulder blades against the back.
Variations:-
Parsva Halasana (pronounced PARSH-vah, parsva = side or flank)
This pose can only be performed with the feet on the floor. Perform Halasana, keeping your hands on your back. With an exhalation walk your feet to the left as far as you comfortably can. One hip or the other may sink toward the floor, so try to keep the pelvis in a relatively neutral position, hips parallel to the floor. Hold for 30 seconds to 1 minute, then inhale the feet back to the center. Take 2 or 3 breaths, then exhale the feet to the right for the same length of time, come back to center, and release Halasana.
Preparatory Poses:-
- Salamba Sarvangasana
- Setu Bandha Sarvangasana
Follow-Up Poses:-
- Adho Mukha Svanasana
- Paschimottanasana
Deepen the Pose:-
When coming into this pose (and its companion, Salamba Sarvangasana) you can squeeze the shoulder blades together to help yourself lift up onto the tops of the shoulders. But once situated in the position, broaden the shoulder blades across the back, into the resistance of the outer upper arms.