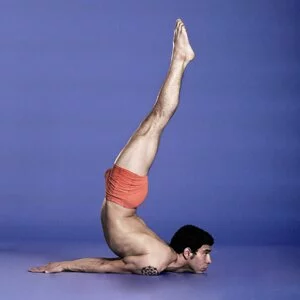
Salabhasana, Shalabhasana (Sanskrit: शलभासन; IAST: Śalabhāsana), Locust Pose or Grasshopper Pose is an asana.
The name comes from the Sanskrit words “shalabh” meaning “grasshopper”
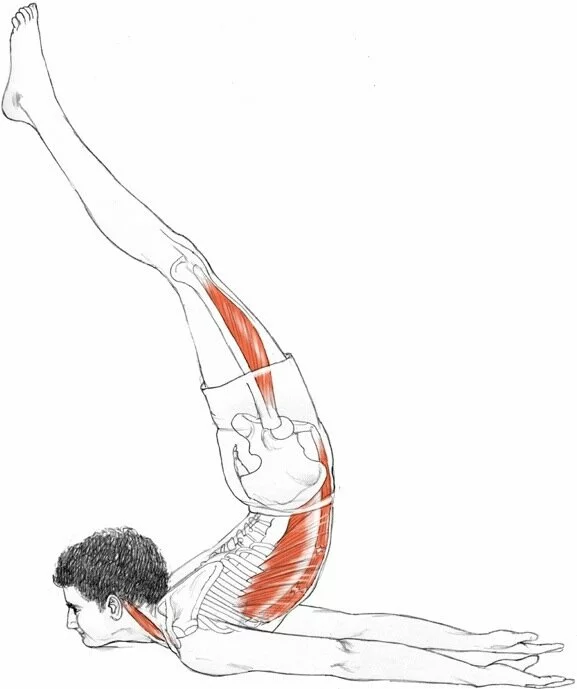
It is backbend, or spine stretch, using the strength of the upper and middle back to lift the weight of the legs as high as possible from a starting position face down on the floor. It improves flexibility and coordination and increases strength and stamina.
Beginners may find that their shoulder and elbow flexibility is not sufficient to allow them to get the hands palm down right underneath the body.
Step by Step:-
- For this pose, you might want to pad the floor below your pelvis and ribs with a folded blanket. Lie on your belly with your arms along the sides of your torso, palms up, forehead resting on the floor. Turn your big toes toward each other to inwardly rotate your thighs, and firm your buttocks so your coccyx presses toward your pubis.
- Exhale and lift your head, upper torso, arms, and legs away from the floor. You’ll be resting on your lower ribs, belly, and front pelvis. Firm your buttocks and reach strongly through your legs, first through the heels to lengthen the back legs, then through the bases of the big toes. Keep the big toes turned toward each other.
- Raise your arms parallel to the floor and stretch back actively through your fingertips. Imagine there’s a weight pressing down on the backs of the upper arms, and push up toward the ceiling against this resistance. Press your scapulas firmly into your back.
- Gaze forward or slightly upward, being careful not to jut your chin forward and crunch the back of your neck. Keep the base of the skull lifted and the back of the neck long.
- Stay for 30 seconds to 1 minute, then release with an exhalation. Take a few breaths and repeat 1 or 2 times more if you like.
This Asana is not as easy as it seems. As a safety guideline, listen to your body and stay within your limits. It is advisable to do this pose and other Yoga Exercises under the supervision of a Yoga instructor.
Anatomical Focus:-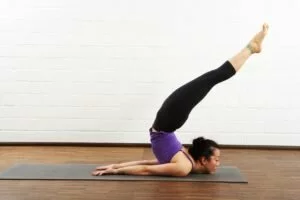
- Buttocks
- Hamstrings and calves
- Lower back
- Lungs
- Upper back
- Upper arms
- Neck
Therapeutic Applications:-
- Fatigue
- Flatulence
- Constipation
- Indigestion
- Lower-back pain
Benefits:-
- Strengthens the muscles of the spine, buttocks, and backs of the arms and legs
- Stretches the shoulders, chest, belly, and thighs
- Improves posture
- Stimulates abdominal organs
- Helps relieve stress
Beginner’s Tip:-
Beginners sometimes have difficulty sustaining the lift of the torso and legs in this pose. Begin the pose with your hands resting on the floor, a little bit back from the shoulders, closer to your waist. Inhale and gently push your hands against the floor to help lift the upper torso. Then keep the hands in place as you do the pose, or after a few breaths, once you’ve established the lift of the chest, swing them back into the position described above in step 3. As for the legs, you can do the pose with the legs lifted alternately off the floor. For example, if you want to hold the pose for a total of 1 minute, first lift the right leg off the floor for 30 seconds, then the left leg for 30 seconds.
Preparatory Poses:-
- Bhujangasana
- Gomukhasana
- Setu Bandha Sarvangasana
- Supta Virasana
- Urdhva Mukha Svanasana
- Virabhadrasana I
- Virasana
 Follow-Up Poses:-
Salabhasana is good preparation for all of the “baby” backbends, including Dhanurasana and Ustrasana. Other possible follow-ups include:
- Bharadvajasana
- Salamba Sarvangasana
- Setu Bandha Sarvangasana
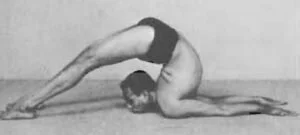
Deepen the Pose:-
Advanced students can challenge themselves a bit more with a variation of Salabhasana. Instead of stretching the legs straight back from the pelvis, bend the knees and position the shins perpendicular to the floor. Then, as you lift the upper torso, head, and arms, lift the knees as far away from the floor as possible.