 Pasasana (Sanskrit: पाशासन; IAST: pāśāsana) or Noose Pose is an asana.
The name comes from the Sanskrit words pasa (or pasha) (पाश, pāśa) meaning “noose” or “snare” and asana (आसन) meaning “posture” or “seat”.
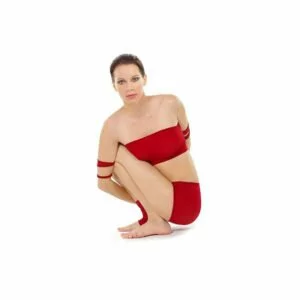
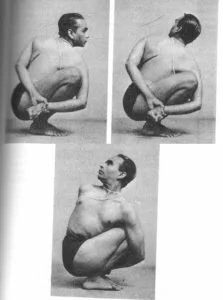
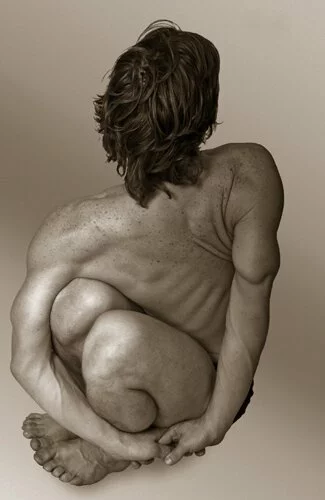
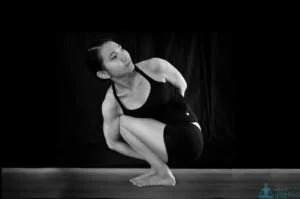
In this yoga asana, the human body creates a ‘noose’ when the practitioner wraps their arms around their squatting legs with their hands clasped behind their
back, while twisting to one side.
Step by Step:-
- Begin the exercise by standing in the Tadasana (The Mountain Pose).
- Bend your knees in such a way that you are squatting completely and the buttocks are close to your heels and your torso against your thighs. If you find it difficult to squat placing the feet flat on the ground, you could place a blanket that is folded or a sandbag below your heels.
- Twist your body from the belly, towards the right side. Extend your left arm, bringing its upper part to the outer side of the right knee.
- Turn your palm down, bend your elbow and wrap your forearm around your right shin.
- Extend your right arm, before sweeping it around and towards the back. Grab your left wrist in your right hand. In case you find it difficult to execute this step, you could use a strap to close the gap. Alternately, you could just hook your fingers.
- Deepen the pose by using the arm that is placed against the knee to twist further, towards the right. Turn your head towards the right too, to make it easier. At the same time, pull your shoulder blades down the back and towards each other.
- Make sure that your outer hips are firm and press your heels into the floor, thereby lowering your sitting bones towards them.
- While breathing in lift the sternum and lengthen it out, through the top of your head
- While breathing out, twist your body a bit more, leading with your left ribs
- Release the twist after around 5 breaths or so. Repeat the exercise with the other side of your body.
Precautions:-
In case you are suffering from any knee problems and injuries, you may need to avoid deep squats
Do not practice this pose, if you have a lower back injury, or if you experience pain in the back due to any reason.
Those who have a herniated disc should not try to execute any yoga twists, like the Noose Pose.
Beginner’s Tip:-
The Noose Pose is one of the more advanced yoga poses, as you need to squat, balance your body and turn it in a twist at the same time. Not many people can execute this pose perfectly the first few times they try it. If you are trying the Noose Pose for the first time, it may be advisable for you to try a simpler version of the sequence, where you stand close to the wall, so that it is possible for you to use it as a prop.
Several beginners also go through the rudiments of the Noose Pose, while they sit in a chair. To practice this pose using the chair for the first time or so, sit near the front edge of your seat. Press your left hand on to the outside of your right knee and then twist your body to the right. To improve the twist, you could push your right hand against the back of the chair and lift your spine. Breathe in and out slowly, a few times and maintain the position. Lean forward slightly, pressing your left forearm to your knee. Hold the position for a few breaths and then try to lay the left side of your torso down, close to the top of your thighs. Make sure that your palms are pressed evenly and firmly against each other. Slowly, untwist your body and get up, while you breathe out. Repeat the entire exercise, with the other side of your body. Once you feel comfortable practicing this sequence, you could try the simpler Noose Pose, using the wall.
Benefits:-
- The abdominal muscles get stimulated when you practice the noose pose, which improves digestion and enables your body to eliminate waste material more effectively.
- The spine stretches considerably while you execute this pose, which in turn strengthens it. The additional benefit to this body part is that the circulation of blood and oxygen to the area increases, thereby promoting a healthier nervous system
- The regular practice of this pose tends to relieve the tension in the back, shoulder, and neck.
- The chest, shoulders, ankles, thighs and the groin area open up and become stronger because they stretch during this posture
- Therapeutic Applications :
- Relieving asthma
- Alleviating back, neck and shoulder tension
- Reducing problems related to indigestion and flatulence
- Decreasing the discomfort women go through, during their menstrual cycle
- Helping conditions such as sciatica
Variations:-
- Stand in the Mountain Pose (Tadasana), making sure that you are around a forearm’s distance from the wall
- Let the knees bend, so that you squat completely. Your buttocks need to be sitting on your heels
- Swing your knees a bit towards the left side.
- Breathe out and turn your torso towards the right. Use the wall for support, by pressing both your hands into it. While you press your left hand into the wall, the elbow should press against the outer part of your right knee.
- Snug your knee into the armpit and bend your elbow, before swinging the forearm around the front of the shins.
- Place your hand just on the outside of the shin
- Breathe out and sweep the other arm behind your back
- Grasp the upper wrist or hand with the hand at the bottom
Preparatory Poses:-
- Half Lord Of The Fish Pose (Ardha Matsyendrasana)
- Cobbler Pose (Baddha Konasana)
- Child Pose (Balasana)
- Bharadvaja’s Twist (Bharadvajasana)
- Cow Face Pose (Gomukhasana)
- Garland Pose (Malasana)
- Sage Pose I & III (Marichyasana I and III)
- Revolved Side Angle Pose (Parivrtta Parsvakonasana)
- Reclined Bound Angle Pose (Supta Baddha Konasana)
- Reclining Big Toe Pose (Supta Padangusthasana)
- Hero Pose (Virasana)
 Follow Up Poses:-
The Noose Pose is usually a part of a long seated twist sequence. However, it could also help as warm-up when doing twists such as Ardha Matsyendrasana or the Half Lord Of The Fishes Pose and Marichyasana III or The Sage Pose III.
In case you are a beginner to the Noose Pose, it is important for you to make sure that you practice it under the guidance of a yoga expert, to avoid any injuries. In the initial stages, you may also need to practice this pose with the help of your teacher or a partner